Showing posts with label Christmas. Show all posts

Wednesday, December 22, 2010

Reindeer Christmas tradition- magic reindeer food & reindeer cookies :)

 Now the munchkins are getting a little older, understanding Christmas and it's excitement more it's time to start our own Christmas family traditions...yay!

Reindeer's are fascinating creatures...my kids love them as I do so what better than a Reindeer themed tradition to start us off :)

This tradition will include a craft activity, secret baking (mummy only) and lots of excitement and happiness for all.


On a day in the week prior to Christmas day the munchkins will be involved in making Magic Reindeer food, which they will then sprinkle on our house lawn on Christmas eve to guide the reindeer's to our house. We will also be leaving a milk and cookies out for Santa, but you can't feed Santa and not the reindeer's can you...now that would be rude! :P

Secretly (when the munchkins are sleeping in the week prior to Christmas) I will bake Reindeer face cookies. On Christmas day the munchkins will discover that in return for their kind gesture of magic reindeer food, the reindeer's left us some reindeer's cookies baked by Mrs Claus! .....now that's special :D

This Christmas is the first year for this tradition- the magic reindeer food is made, the cookies baked and the excitement is building.

If you want to join in on this simple yet fun activity see pics and details below :)
Keep in mind that Magic reindeer food is also a great gift for school friends, kindy friends, playmates or grandchildren.

 MAGIC REINDEER FOOD
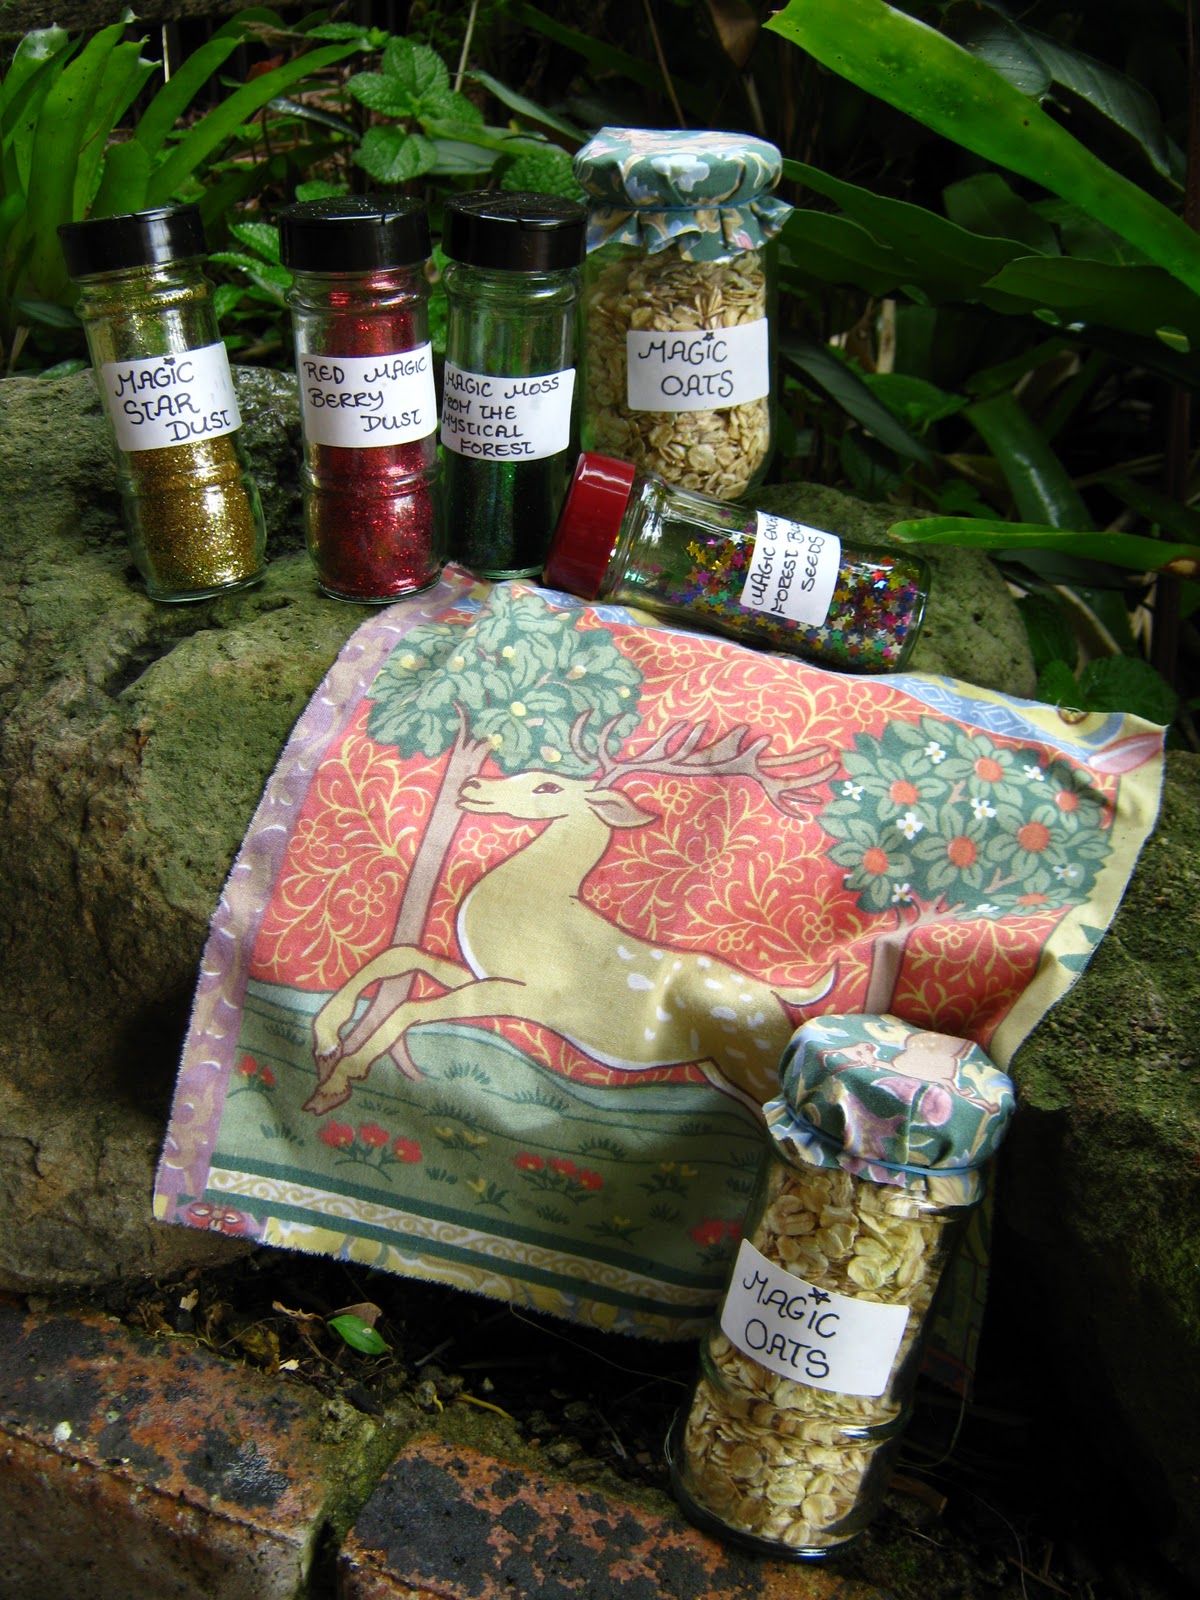
What you need:
*oats
 (magic oats)
*fine gold glitter
(magic star dust)
*fine red glitter
(red magic berry dust)
*fine green glitter
(magic moss from the mystical forest)
*multi coloured chunky glitter stars
(magic enchanted forest bloom seeds)
*container, glass jar or small glad snap bag
*fabric to place on top of jar lid (optional)
*Reindeer poem tag
Click on these links to print out a pre-made reindeer poem tag
Colour Reindeer poem tag
Black and White Reindeer poem tag


Reindeer Poem to go with:


Sprinkle on the lawn at night
The moon will make it sparkle bright
As Santa's reindeer fly and roam
This will guide them to your home.


Help child(ren) to place all ingredients in small bowl and mix.
Once it's all mixed up and looking pretty put into container, jar or snap lock bag. Attach Reindeer poem tag and it's all ready to sprinkle out on Christmas eve.
Here is our Magic Reindeer food all bagged up and ready to go.


 MRS CLAUS' REINDEER COOKIE RECIPE

 Dairy free, egg free and nut free! (Mrs Claus know all you allergy needs) :D

*125g butter (or nuttlex for those who can't have dairy)
*1/3 cup caster sugar
*approx 1/4 cup golden syrup
*1 3/4 cup sifted self raising flour
* Pretzels
*sweet william choc chips
*raspberry flavour artisse organic lolly pops or cachous (silver cake decorating balls)

1. Beat butter and sugar to a cream and set oven to 180 degrees
2. Add golden syrup and beat well.
3. Slowly add sifted self raising flour.
4. Roll out dough on a lightly floured surface to approx 1cm thick and cut out circles using a cookie cutter or glass (we used a 2 1/2 '' diameter cookie cutter)

 5. Using thumb and forefinger, pinch opposite sides of each slice about two-thirds of the way down to shape face.
Don't be too shy about pinching the sugar cookie dough to form the muzzle, as it will spread out while baking.
6. Break curved sides away from center of each pretzel twist to form antlers. Press bottom of 1 set of antlers on each side at top of each reindeer face.
7. Place two choc chip eyes on each cookie (you could also use sultana's if you like)
8. Smash up a lolly pop into smaller pieces and press into dough for a nose or use a chahous. (you could also use m&m's or a glazed cherry if allowed).
9. Place in oven for approx 10-15 min, time will vary in different ovens.
10. once cookies have cooled place them in a sealed container and hide until the big reveal on Christmas day!
enjoy :)


I would love to hear what Christmas traditions your family has, please leave a comment.

Sunday, December 19, 2010

Paper plate Christmas Wreaths and Angels

Declan's decorations
Thalia's decorations


crafting away!
Thanks to the inspiration of Nicky's Rhyme time blog, we made our own paper Christmas Wreaths and angels and aren't they just simply adorable.


We thought we could do with some extra decorations around the house.


It's also nice to build the munchkins excitement now Christmas day is getting very close. I don't know who is more excited them or me :P


For the wreaths we cut out the middle of the paper plate, painted it and gave the munchkins cut outs of Christmas wrapping paper as well as a variety of stickers so they could decorate their wreaths however they liked. A ribbon of their choice made a great bow for the top of the wreath.

The paper angel shape takes no time at all to cut out from a paper plate. Use a hole punch for added detail at the edges of the plate.
We decorated ours with aluminium foil, googly eyes and a pen for a nose and mouth.

Christmas cards

Some of the Christmas card we made
Have you got your Christmas cards sorted yet?

We love making our own Christmas cards so we got out some materials from our craft cupboard last week and got to work.

We used cutouts of old used Christmas cards, glitter, chunky Christmas glitter, pretty paper, scrap booking supplies we had, stickers, paint and of course buttons!! :D

You can make wonderful looking cards without the issue of cost.


Think of the things you have lying around that you could use. (Christmas wrapping paper, children's paintings, patty cake papers, aluminium foil, cookie cutters....)

I think homemade cards add a lovely touch to a gift- much more personal, meaningful, unique and pretty.

 When children are involved, it's a way to give your child's art to loved ones. It creates a memory of not only Christmas but captures a time in your child's art life to keep.

Monday, December 6, 2010

Christmas drums for toddlers as easy as pa rum pum pum pum

 Every child loves a drum and what better that a special Christmas drum.
For a very easy, quick craft activity you can re-use and recycle to transform discarded items into a much loved toy.

What have you got in your home that has the potential to become a craft opportunity?
Think before you bin great crafting tools/materials that are most commonly looked at as rubbish, empty food containers, boxes, cling wrap and toilet rolls and so on.

We are lucky enough to have a collection of empty formula tins passed onto us by a friend to use for craft containers/materials and in this case transformed into 2 very festive drums.

 By using old formula tins or tins from food items (eg. powdered milk tins, Milo tins etc...) you can do the same.

You can use the existing lid if suitable or craft up your own lid with materials such as fabric, a cut out from an ice cream container lid, ducting tape, leather. Just remember if you are making you own drum lid be sure to seal it to the container.

If you wanted to keep a metal lid (for example from a Milo tin) you could include drum sticks ( chopsticks, wooden sticks, large twigs etc) instead of creating a hand drum.

All that was needed was a paint of festive coloured paint and some sparkles sprinkled on the wet paint.

You could decorate your drum however you like- paint, contact, stickers, fine glitter, re-used Christmas cards, Christmas themed cut outs from magazines and many more.

My munchkins lover their drums and they now sit in pride of place next to the Christmas tree on a bookshelf ready for a good sing song or a play.
A favorite song to play with their new drums is the lovely Christmas song 'Little Drummer Boy'
I thought I would share the lyrics :)

Little Drummer Boy


Come they told me, pa rum pum pum pum
A new born King to see, pa rum pum pum pum
Our finest gifts we bring, pa rum pum pum pum
To lay before the King, pa rum pum pum pum,
rum pum pum pum, rum pum pum pum,

So to honor Him, pa rum pum pum pum,
When we come.

Little Baby, pa rum pum pum pum
I am a poor boy too, pa rum pum pum pum
I have no gift to bring, pa rum pum pum pum
That's fit to give the King, pa rum pum pum pum,
rum pum pum pum, rum pum pum pum,

Shall I play for you, pa rum pum pum pum,
On my drum?

Mary nodded, pa rum pum pum pum
The ox and lamb kept time, pa rum pum pum pum
I played my drum for Him, pa rum pum pum pum
I played my best for Him, pa rum pum pum pum,
rum pum pum pum, rum pum pum pum,
Then He smiled at me, pa rum pum pum pum
Me and my drum.

Friday, December 3, 2010

Crafty homemade Nativity set

Yesterday the munchkins and I set out to make a homemade nativity set, inspired by Nicky from Rhyme Time .
She recently posted different Christmas craft's for toddlers and the toilet nativity roll set jumped out at me.

If you want a great place for crafty idea's for children from 6 months to 4 years, Rhyme time has it all.
You can also follow Rhyme time's page on facebook :)

We don't own a Nativity set of any kind and it's important for my husband and I now the munchkins are a little older, to teach them the true meaning of Christmas.

So it was the perfect time and way to create our own Nativity set, made with big hands with the help of some little hands and loads of love.
Something to treasure for years to come.... well if it lasts the year out, with the all the dramatic play it's been staring in since being made :D

We had so much fun making it together and the Nativity set now lives on the side board in our foyer, so it welcomes everyone who enters our front door.

Never underestimate the many wonderful uses of toilet rolls! :P
I always keep old toilet rolls for our craft days, as they are basically a free art tool/product to add to fun times. So think before you throw your next toilet roll in the bin.
Joseph, Mary and baby Jesus

The Shepherds and a sheep

A pig and the Three Wise men

Wednesday, December 1, 2010

Button Christmas tree decoration's

Today is the 1st of December and the traditional time to put up your Christmas tree, so I thought it's only fitting to do a Christmas tree post.

Are you wanting some more decoration's to add to your tree/collection?
I did and thought it would be good to incorporate decoration making into my crafty time with the munchkins.
Why buy expensive decoration's from the shops when you can make beautiful homemade creation's with recycled materials.
It makes for both a fun activity as well as putting a little homemade love on your tree, not to mention the special touch for your tree!

Originally I was thinking of making Salt dough decoration's together but thought it was not age appropriate for my little ones.
Salt dough creation's easily break, require fine motor skills and can be time consuming, but in saying that they are a great craft for older children and adults.

It wasn't long before I thought up some crafty idea's for us to do, based around our love of buttons :)

CARDBOARD BUTTON DECORATIONS
-great activity for toddlers
Firstly as pictured above I assisted the munchkins in making some decorations incorporating cutting, gluing, colour recognition, decision making and pure button fun to result in a very enjoyable crafting journey, which ended in some very cute decorations indeed.

Materials needed:
green cardboard, ribbon, hole punch, pva glue, variety of buttons, scissors, yellow cardboard or felt for the star on top of the tree and a little bit of imagination.
Method:
We chose to cut out Christmas tree and ball shapes (Mummy did the cutting), if you have older children they might like to help with the cutting.
Make a hole with the hole punch in the desired area.
Apply glue, add desired buttons and finish with a ribbon to hang. Too easy!

FELT BUTTON DECORATIONS
While the munchkins were busy choosing and gluing buttons I thought I'd have a go at some felt decorations that would last longer and would be able to be used for years to come.
Very easy but very effective :)
The munchkins helped me choose shapes, felt and buttons to create these decorations, but the putting together of these decorations requires a big person or older child.

Materials needed:
Coloured felt, cookie cutters, permanent marker, variety of buttons (different sizes, shapes and colours), variety of ribbons, scissors, hot glue gun and glue, needle and thread (optional).

Method:
  1. Choose the cookie cutter shapes you would like to use and match the shapes to the desired colour of felt.
  2. Trace each shape onto the chosen felt with permanent marker so it is easily seen when cookie cutter is taken away. Please yourself if you would like 1 or 2 layers of felt on each decoration keeping in mind that you could have two different coloured felts on the 1 decoration for a colourful effect.
  3. Cut out all of the shapes and pick out button's to compliment your shapes, while choosing button's put hot glue gun on to heat up. Remember to keep a space clear of buttons where you would like to make a hole to hang the decoration.
  4. When glue gun is ready and your buttons are ready, glue them in the selected place by putting a small amount of glue on the felt under where the button is to be placed. The glue will harden and dry out very quickly so do one button at a time.
  5. When your glue is dry and you are happy with the amount of buttons, carefully slit some small holes into each felt shape with the scissors. This will be the hole used to hang the decoration.
  6. After selecting a ribbon's that compliments your decoration, thread them through the hole you have just made and tie to make a loop big enough to be easily placed on your Christmas tree. I have also blanket stitched around some of our decorations for an added effect but please yourself.
  7. Your decorations are ready to hang!!!
Here are some close up photo's of the felt decorations..


Saturday, November 27, 2010

Oh Christmas Tree Oh Christmas Tree...

 Okay so I know that traditionally your meant to put up "the tree" on the 1st of December but we just couldn't wait :P

It's the first Saturday in a while that we had nothing planned other than a family day at home. We thought it was a great opportunity to embrace the festive season while enjoying some quality family time at home.

The munchkins were more than happy to get stuck into tree building and decorating, they proudly accepted their "elf helper hats" and helped Mummy and Daddy create our Christmas tree.

They have been soooo excited every time they have seen a Christmas tree in the shopping centres that they were almost beside themselves when we were finally building ours.

They did get a little confused though and thought that it would be just fine and dandy to take the finished tree, decorated and all from the lounge room out to the backyard for a play outside...lol

You can probably see from the photo's that they were very careful when choosing what decorations would go on the tree next and where they would go.

It was too cute when Declan found a small hanging wooden tree decoration that he insisted had to stand next to the big tree on the floor rather than hang from the tree.
Gees, how wrong would that be ...A tree hanging in a tree!!!lol

We got there in the end though and our tree is up, the special star put in place by Thalia, special homemade decoration's hanging and lights shinning.....yay Christmas is nearly here!


One of Declan's handmade decoration's- some green cardboard,
Mummy's help tracing his little hand, gloopy glue, special sparkles
and lots of LOVE :)


One of Thalia's homemade decoration's- a circle of green cardboard
transformed though her crafty little hands, gloopy glue, a love of all
things girly and the wonder of a child's mind :)


While packing up the toys tonight Declan made it clear that all the babies were to sleep under the tree!

Thursday, November 11, 2010

Christmas Avent Calender Excitment

 To my delight and surprise while doing my grocery shopping tonight in Aldi I found something that filled me with excitement :)

I picked up a Thomas Christmas Advent Calender thinking "My munchkins would love one of these...I love the idea of advent calenders at Christmas....mmm might have to make up my own as I don't think I will ever find a safe one :(..."
Then as I did a double take at the labels and saw the big words "Nut safety promise" and "Free from Artificial colours and flavours"...
I still wasn't convinced until I flipped the box over and read the ingredients list and disclaimers on the back..

IT WAS SAFE!!!!!!!

I was very quick to grab 2 Thomas Advent calenders to put away for my munchkins for Christmas :D

Thought I'd share my experience so you can do the same for your children if they are able to have kinnerton chocolate......sorry for the munchkins with dairy allergies out there.


What is the nut safetly promise?
We go to extraordinary lengths to try to make chocolates safe for Nut Allergy Sufferers.
No Peanuts, segregated production, dedicated lines that have no nut products and countless
other measures for our raw material supplies and staff. Need to know more?
Visit our website at http://www.kinnerton.com.au/
So get to Aldi and grab a allergy friendly Advent calender for all of $2.50 each and share our excitement!!!
 
Copyright 2009 Sublime Shambles of a Shell. Powered by Blogger
Blogger Templates created by Deluxe Templates
Wordpress by Wpthemesfree