Sunday, March 20, 2011

Cutural diversity and Children

We all want  our children to grow up in a world free from bias and discrimination, to reach for their dreams and feel that whatever they want to accomplish in life is possible.
We want them to feel loved and included and never to experience the pain of rejection or exclusion.
But the reality is that we do live in a world in which racism and other forms of bias continue to affect us. Discrimination hurts and leaves scars that can last a lifetime, affecting goals, ambitions, life choices, and feelings of self-worth.

I have said before that in our house we are trying to bring up our munchkins in a way that they can be comfortable in who they are.
 That despite their dietary differences to other children due to allergies and intolerance's, they too can be proud, have fun, be loved, experience the joy of a birthday party, dream, attend a playgroup, get grubby....and many more things so important to childhood
and all the while living a life with allergies.
Our children are beginning to understand how they are different to other children around them and have accepted their differences of food choices and what we have to do to stay safe.

I not only want to teach my children about the importance of food allergies/ intolerance's and how it affects our family and other people.
 I also want them to have an awareness of different cultures in order to prepare them to meet the challenges and reap the benefits of the increasingly diverse world they live in .


I want to raise my children to celebrate and value diversity and to be proud of themselves and their family traditions. We can teach children to respect and value people regardless of the color of their skin, their physical abilities, or the language they speak.


I have started to introduce my munchkins to different cultures by surrounding them in positive things from a variety of cultures, placing these things in our home environment to be read, played with, listened to, loved, watched, respected and spoken about in our day to day lives.

Below is a photo of some of these things that we gathered up for a photo :) looking back at this photo, I forgot sooo many things but you get the drift.


It occurred to me a few weeks ago that I have a baby obsessed little girl, yet amongst all her dolls and babies , even the male and female golly wogs my children have.....we don't have any life like looking  dark skinned baby dolls!!!

In my opinion every little girl needs to have a doll with dark skin and dolls of different cultures.
Think about it for a minute, when we as parents go down the toy isles in the shops we see so many blonde hair blue eyed dolls, brown hair, brown eyes, western cultures, rarely a realistic red head doll with freckles.
It's often very hard to find a doll with that lovely chocolate brown skin, a doll with slanty eyes from Asia, a doll with a physical disability, a aboriginal doll, ...unless you search endlessly, travel or go to a specialty shop..
what does this tell you???

When you think of Disney movies often the heroine's of the story line are princesses or beautiful girl/women with clear pale skin, long blonde/brown hair and lovely clothes.......

Thankfully they are producing and selling a lovely Baby Tiana in the Disney selection of Princess babies thanks to the recent movie......so off I went down to my nearest K-mart and brought her.

Although she was in the shop amongst five other Disney Baby Princesses, all with white skin, two with blonde hair, one with black, one with brown and one with Orange hair.

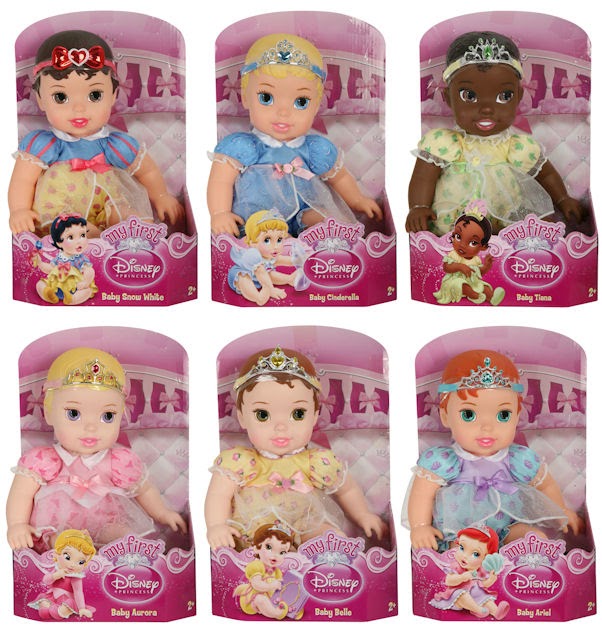
I had to move aside the other dolls and search through quite a few before I found a brown Baby Tiana right at the back of the shelf.....mmm I wonder if that was a coincidence!
I'm only hoping that more people go searching for the baby that is different to their child instead of selecting one with the same hair colour and skin to match the child.
I'm not saying it's wrong to have a white doll if you want one but simply to give your child the opportunity to incorporate other cultures into their play.

I f you don't know where to start when trying to introduce different cultures to little ones, here are some easy ways:
  • get picture books from the library from other country's to explore animals, people and places from different cultures.
  • Introduce your child to different types of musical instruments and talk about where they come from (ie. bongo drums, maraca's, tin whistle etc)
  • When selecting music for your child to listen to think about cultural music (amongst our music we have music from Finland, Africa, India, American Indian, Irish and so on)
  • Have fun at the appropriate age to introduce the concept of food from other cultures (this is easy the diverse foods we can buy in Australia because of our mixed cultures)
  • If you have family or friends traveling to another country, give them some money and/or ask them to bring you back a traditional object/toy.
  • Take the opportunity to explore other cultures celebrations with your children through craft, games and food (e.g. valentines day, Chinese new year, St. Patricks day...)
  • Have fun Scrap booking about country's and their cultures.
  • Select children's books that show a positive cultural message.    ("Ten Little Fingers, Ten little Toes "by Mem Fox is a good one for little ones) There are many more when you go looking.
  • Sing songs and finger rhymes in other languages
  • Introduce your children to the concept of sign language, it's use and have fun learning some words.
These are all simple things you can implement in your family life to give your children an open mind when it comes to different cultures and help them to reap the benefits to a wide world of culture and diversity. To learn, to enjoy, understand and respect how other people live and look.


My BIG little girl

Once again I have been reminded that my baby girl is growing up...
For the first time in almost 4 years we no longer have  a cot set up in our house, our baby girl moved up into a BIG bed a couple of weeks ago and hasn't looked back.

It's a bitter sweet moment for Mummy and Daddy knowing that she is no longer a "baby" in a cot, but in a single bed (still and always our baby :D)- climbing up and down all by herself and loving it.
Watching her grow, learn and using more self help skills is great, but their is always that little sigh when you realise that your baby doesn't need your help quite as much anymore.

We are glad that we made the change though and she has been fantastic with the transition, it helped a great deal that we waited till she asked for a bed.....so much so that she was tucking herself into her brothers BIG bed trying to claim it as her own :P

Thalia came to the shops and helped to pick out her BIG bed, a quilt cover was purchased some time ago (Fairy themed) to suit her personality and interests and we took the opportunity to "do up" a Big girl room.
Her beloved Pop was very kind to assist in painting her room while we holidayed in NSW back in February and after taking out the cot and change table ( nappies are now changed on her bedroom rug she got at Christmas) a few finishing touches were made by Mummy and the room was ready!

So far she hasn't ventured from her bed at night or during her day nap to play with toys, bang on the door, create some chaos, sleep on the floor or rearrange her room, but I'm sure it will come.

Here is a photo of her sleeping on her first night in the bed, sleeping soundly and very close to her prized car "Lightning McQueen" (Disney Cars Character) -  it almost looks as if they are kissing :D


So How does your family plan and make the transition from cot to bed and at what age?

Monday, March 14, 2011

Golden Chicken


GOLDEN CHICKEN

This is one of the favourite chicken recipes at our house at the moment.
We added it to our dinner menu when the munchkins started the fail-safe diet in October of last year, it's from the Sue Dengate 'The Failsafe cookbook'.

The book doesn't lie when it states that there is a tantalising smell during cooking and it has a very lovable taste!

Ingredients:

600 g chicken breasts, skinned
Marinade-
2 tbs canola oil
3 tbs golden syrup
2 shallots, finely chopped
1 clove garlic, crushed
1 pinch citric acid
salt to taste

Method:
Cut chicken into strips or shaker nuggets.
Add chicken to marinade and coat well.
Cover and marinade for 30 minutes if possible.
Preheat grill or BBQ. Cook until browned on first side. Turn chicken and cook until done.
Test the chicken with a skewer.The juices should be clear when the chicken is cooked.
To prevent burning, keep chicken pieces touching.
Serve with mash potato and other permitted vegetables, or on rice or fried rice with chopped swedes, bean shoots, green beans, shallots, garlic and salt.

Bird Crafts


The munchkins and I had a fabulous time making lots of different bird crafts for Miss 2's Bird birthday party.


 So I thought it would be nice to share these crafts with you and the "how to do's" along with them.


These crafts are cheap and easy to make..... don't be afraid to have a try.


Hopefully someone else can have the fun we had while making some of these crafts.


Proud Peacock paper plate craft
For a simple bird craft or a crafty peek into India's animals (The peacock is native to India) all you need is:

*dinner size paper plate
*glitter
*pens, markers, pencils or crayons
*paint fingerprints or stickers for peacock feather spots (we used stickers)
*peacock feathers (we googled 'peacock feather' into images and printed out some paper feathers to cut out and stick on)
*glue
*blue paper for body

Allow children to decorate plate, draw lines with blue, green and purple shades of markers, the lines should all cross in the center of the plate. Have the children dip their index finger into a selected color of paint (we used colourful stickers) and make fingerprints here and there on the plate.

Let children apply glue and glitter and your choice of feather (real feathers, paper feathers found of Google etc) and put aside to dry.
While the plate is drying draw a ten pin bowling shape out of blue paper for the body. A beak can be either drawn on or cut out of paper as well as eyes. To finish glue all you bits together !


Hand print Rosie tree with doves
This birdie tree was a project that came together over the space of a couple of days.

First of all we made the adorable paper doves over at DLTK's craft for kid's.
They are easy to make and a fun craft using the technique of tracing the child's hand. All the doves body parts except for the hand print wings are found on the above link with instructions, simply print cut and paste. :) my munchkins enjoyed colouring on their birds too.


Stage two of our tree was involved Mummy drawing a branch shape on brown cardboard for cutting.
If you need some inspiration simply look outside into nature, do a sketch at the park or look up tree pictures on the Internet. I used roughly 3 lengths of big cardboard sheets to make this tree branch.
Make sure you leave enough space on the branch for the dove(s) to sit.

The third stage of our tree was a printing craft.
We got creative with paint and made some roses and leaves for the tree.
The rose print was made but cutting off the end of a celery bunch (something we almost always have in the fridge), it makes the perfect flower/rose print.....add pink paint a ta daaaa!
We also cut out a leaf shape from a common potato and with green paint made leaves for the tree.
This was a opportunity to get messy and learn to mix paints and make colours (yellow and blue make green, red and white make pink).

The forth stage to our tree was yet another hand print craft, since the munchkins enjoyed tracing hands so much. This time we used two shades of green cardboard for tracing our hands to make hand print leaves.
We spoke about the different sizes of our hands and how big our hands have grown and how our body grows bigger as we get older.

The last stage of our tree was gluing, stapling and blue tacking all the bits and pieces together to make a perfect home for our doves.

This tree made a great wall art feature for Thalia's bird party and is still on our wall today for the children to enjoy....one of these days Mummy will take all the bit down and put away what we can reuse and keep.
Bird tree table decoration

This table decoration is attractive, cheap and fun to make!
  • The birthday girl and I went for a few walks in the park together to find some nice tree twigs and small branches to assemble together for the perfect tree.
  • Once the tree twigs and branches were selected, they were painted white and when dry were put together in a vase from the cupboard.
  • To decorate our tree we already has picked up some sweet little glitter birdie clips (decorations found with all the Christmas ones from a cheap shop).
For our tree to be just right for the party it needed a little something else and then we found what we needed to do.
Kelly at Be a fun Mum posted how to make a hanging Christmas peace dove decoration, so we simply changed our paper colours and patterns to suit the party colours and we had some lovely doves ready to hang on our tree :)

Tissue paper pom pom flowers
Okay, so these are not birds but birds like flowers don't they? :)
and they were simply too cute and girly not to make.
Thankfully I was able to find a very helpful and easy instructions to follow to make these.....while the kids were in bed. I wanted these hanging flowers to be a surprise for he birthday girl on her party day.

Here is the link for Martha Stewart's tissue paper pom poms that I used. They look stunning, easy to make and quite inexpensive.
My little man still has a blue one hanging in his room :P

Birdie's and their nests
Birds nests can be made from all sorts of things and what better decoration for a bird party than a bird and it's nest!
Pictured are two nests we put together for decorations using twigs from the park, bright feather amongst the twigs, leaves and topped off with bird ornaments found and brought at cheap stores for under $5 each. We choose mummy's ornamental bird cage and a big wooden bowl to put our nests in.

Thalia's bird themed Paper bunting
Paper bunting are easy to make and can be made to suit any theme, we laminated our paper flags so that they could be kept as a keepsake and a room decoration for Thalia.
Each triangle was cut out so as to fit inside a A4 size laminater sheet.
The photo is not very clear but each triangle is a different patterned pink scrap booking paper, we then stuck white paper doily's in the centre of each one. Paper doily's can be found very cheaply at shops such as crazy Clark's, reject shop, Sam's warehouse and so on.
We cut out pink letters to spell Thalia's name and found pictures of blue birds to stick on each flag on the letter.
To finish it of the flags were individually laminated, 2 holes were punched in the top of each one and pink ribbon was used to attach them all together to hang.

Bird feeder
We found this nifty fun design here, the munchkins enjoyed making it with me and the birds love it too.
It was also a way to attempt to lure and invite birds to the bird party :)

Loot bags
These we so inexpensive compared to the ones you buy and I think homemade is almost always nicer and more environmentally friendly!
I purchased the pink and blue paper bags (pink for girls, blue for boys) and glued on white paper doily's to the centre of each bag. The munchkins helped me to choose a birdie sticker from our sticker stash to suit each special little friend to stick on the doily. Then the names were written in pink or blue pen next to their personalised birdie :)

Paper plate owls

We made these paper plate owls with some friends after finding the project on the Internet.
You can find the instructions here, we added the lovely button eyes, scrapbook paper collage and feathers to make it such a hoot ;)

I hope you have enjoyed looking at our bird crafts, maybe you can put some time aside to share some bird craft love with your child :)

 
Copyright 2009 Sublime Shambles of a Shell. Powered by Blogger
Blogger Templates created by Deluxe Templates
Wordpress by Wpthemesfree