Sunday, August 21, 2011

Up-cycled dress for my Little Miss

I always enjoy searching and finding new blogs to add to me reading list, since becoming a whole lot more interested in sewing lately I have been on the hunt for inspiration, help, tutorials and ideas.
I became filled with utter delight when finding I Am Momma -hear me ROAR, Cheri is a talented Mother full of creative idea's ,lovely designs,tips and tutorials....YAY!
Upon finding her blog a few weeks back, I have had fun reading back though her older posts and finding lots of inspiration in many area's of creativity and it's always nice when I see there is a new post to read :)

I had no doubt in my mind when seeing THIS post that it would make a perfect first dress to make for my own Little Miss.
The tutorial was so easy looking, using old T-shirts and up-cycling them to create a unique and funky dress. I loved the way the seams where on the outside, giving the dress a messy rough look, almost as if it had cute little frills on the outside due to where the seams were placed.

My Thalia is quite a girly girl with a streak of tom boyishness, she is the one that always wears a little bit of bling, adores anything pink, gets ubber excited when it's time to do her hair and pick a hair clip, loves pretty things, has loads of "children" (dolls, babies, teddy, little people), Sings with great joy, twirls to see her dress/skirt fan out, already has a thing for nail polish and quite a collection of hand bags. Sure she oozes girly but on the other hand she loves getting dirty, Queen of the mess, enjoys anything cars, eats like a man, loud and never ceases to amaze me when I see her petite little frame in dare devil mode.

So with this dress the potential of having a messy patchy look matched with girly materials and frills was just the thing I could see Thalia wearing, be it on a play date, out in the garden or dancing.

On finding a few t-shirts at a sale at the shops lately with this dress in mind I got to work.
I have only made one up cycled dress so far (for next years cooler months) due to finding an adorable size 3 shirts for $7 new!

I went through my own wardrobe and put aside tops I no longer wear, tops with holes, tops I have grown out of and placed them in a bag to be up cycled, something I hadn't thought of doing before starting this sewing journey. After some matching and cutting of two of my own old shirts this is what I came up with...
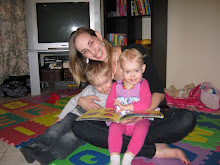
Before the sewing started.
The green material from a shirt of mine that had a hole in it,
but I adored the colour and feel of the fabric.
You can't see it well in this photo but that other fabric is
grey with a tiny blue floral pattern.
I love stripes and thought since I had enough material
I would only use these materials instead of using multiple fabrics.

 Since I still had some left over fabric from my tops
I thought it would be nice to add some extra detail.
Using both the fabrics and tracing around a flower shaped cookie cutter,
I made a design to hand stitch to the top of the dress,
 giving it that bit more girly appeal as well as some hand stitched love.


here is my cheeky girl trying on Mummy's newest creation!
 Although it doesn't quite fit right now you get the idea,
hopefully it will be a nice fit next year in the cooler months.

Thanks again to Cheri of I Am Momma -hear me ROAR
for the inspiration!!!

Friday, August 19, 2011

Making a Scarecrow

After a morning helping Poppy in the veggie garden, a very serious conversation arose at the lunch table, between my 4 year old and 2 1/2 yr old.

After a long conversation about what makes the plants grow, the veggie garden, the birds and dirt girl world (a much loved telly program) ,it was decided that Poppy needed a scarecrow to look after his garden to scare away the silly birds.

Living on a house on the same property as Poppy, we often hear the yells, shouts and curses directed towards the local magpies and crows from dear old Poppy.
Poppy often runs out of the house (sometimes wearing only a dressing gown!) like a bolt of lightning to save a baby corn cob or tell a crow off after pecking at a lovely specimen of fruit.

I guess the kids in one way or another the munchkins have realised that Poppy doesn't like the silly birds much and needs a way to get them away.

Not long after Mr 4's Birthday Party we found a nice day to carry out our scarecrow plan.

On reminding the munchkins of their scarecrow idea, they instantly got excited and told me that they had to make a scarecrow just like Hay man (scarecrow from the Dirt Girl world tv series).
 Declan even ran to the play kitchen and said "Mum, he will need some bangers! just like these (holding up two small saucepan lids) he can bang them like Hayman does to scare the birds"

You can see character hayman on the left of this picture :)

First it was off to the second hand store to find some scarecrowish clothes, on finding blue pants, a stripy scarf, cowboy like hat and a check shirt we made our way home. The munchkins had the most input in what was brought.

On arriving home the first task was to find Poppy, ask him where in the garden would be a good spot for our scarecrow and then ask for some help in making Hayman because Mummy really had no idea
Poppy is really good and making stuff.
choosing a good spot!
Then we got to laying out the body parts.
A broom head, pipes for legs, various wood lying around
all secured with good old zip ties.
time for the stuffing to begin
Time to dig some holes and stand him up :)
In the end Poppy and the munchkins all had a good time
(I'm not sure who enjoyed it more!) and all three had a big lunch and a nap :P
Here are the happy bunch with our new scarecrow Hayman!

Just quietly although this was a great project, I don't think our Hayman
is doing his job properly...
Mummy might have seen a crow pinch some corn while Poppy was out the other day.
Perhaps we should have given him eyes!! LOL
shhhh don't tell Poppy.

Mummy still isn't used to Hayman yet, getting the groceries out of her car on a Thursday night has become quite scary when you think you saw a man creeping up against your fence!
Never the less I'm sure Hayman will find his place in the backyard and the kids do check on him most mornings. Quite cute really :D


Thursday, August 18, 2011

Squiggly Wiggly Potato

There white, they are edible, most people have them in some form in their dinner and they have the potential to make all sorts of textures.......Potatoes!!!

I was getting sick of the same old mash, chips, potato bake, baked potatoes and so I went on the search for a new recipe for a potato side to go with dinner.
That's when I found a recipe for Crispy Potato rosti.
After a quick look, I realised yes it's safe, looks good so Wednesday this week we had a try and the potatoes were enjoyed by all, definitely a do again recipe!!!

They made the perfect side to our steak and steamed veggies.
After painting a squiggly wiggly monster Wednesday morning, Declan decided that the rosti's will now be known as Squiggly wiggly potatoes! :P

Without any further ado, here is the recipe if you would like to make some too.

Crispy Potato Rosti Squiggly Wiggly Potato :P

makes:8
preparation time: 10 min
cooking: 12 min

700g potatoes, peeled and grated
1 egg (we obviously used 'no egg' powder due to allergies)
2 tbsp chopped chives
2 tbsp plain flour
1/2 tsp baking powder
vegetable oil, to shallow fry (we used canoila oil)

  • Squeeze handfuls of grated potato over  bowl to remove as much liquid as you can. Place the squeezed potato in a clean bowl.
  • Add egg and chives, and sift over flour and baking powder. Mix until combined. Season with salt and pepper
  • Heat about 4 x 1/4cupfuls of mixture into the pan and flatten slightly, to about 8cm. Cook over a medium heat for about 3 mins each side, or until golden brown and crisp. Repeat with remaining mixture. Drain on paper towel.
Enjoy!!!

The racing car party for my Little man


Last month my little man turned the BIG 4! It was no surprise that he had chosen a racing car themed party this year and with much excitement helped me organise his party.
We had a few weeks of sickness leading up to his party but we got there in the end and Declan was rather chuffed with the results.

Here are few things that we made leading up to the party, getting the kids excited and involved in the party planning....
Traffic lights collage craft, good decoration for a car party
but a great opportunity to teach the munchkins about road signs and safety.

Race car track collage
The birthday boy really wanted to make his own race track art so with a large piece of blue cardboard (his fave colour) we went to work with black paint, scissors and glue.
He picked racing cars and monster trucks from wrapping paper for us to cut out and picked people to watch the race from magazines.
For some odd reason he had to have all girls and women watching, go figure.
Then to top it off dirt, leaves and wood chips from the garden were collected to make extra details.

Racing car and Construction vehicle mobiles to hang at the party.
These racing car project can be found HERE and the Construction vehicle mobile HERE
both from DLTK's Crafts for Kids.


This next project is not racing car themed but both the munchkins got so excited when they saw it as we were searching for crafts that we did it anyway :)
I guess the party moved on to be a transportation theme in the end...lol

We found this craft HERE and turned it into a collage for the wall.
Again this proved to be a good opportunity to talk about fire safety and how fire fighters help people as we crafted away.
The birthday boy came up with idea's such as bubble wrap for the water coming from the fire hose and Cotton balls for smoke.

Then due to Mummy loving buntings and now able to sew, I thought I'd have a crack at sewing him up a personalised name bunting with racing checkers.
It now hangs in his bedroom.
We also had this grand plan of making part of our unused garden space out the back of the house into a mini race track for match box cars.
Although the garden was cleared, a concrete slab went down thanks to hubby and a friend, used car tires were used and a new garden put in around it......it didn't get finished :(
When we got to buying the paint for the concrete and gluing the fake grass down, the nice man at the hardware shop told us we had to wait!
Apparently we would have to let the concrete age at least 8 weeks before we could paint and glue onto
the surface or deal with it all peeling off and be a waist of money.
So we sucked it up and did the best we could and the kids still loved it.
In the coming months we will finish it properly but it's being loved all the same.
The munchkins have fun filling up the backs of the construction trucks with rocks from the garden and exploring the space.
Here are a few pics of the space during the party...
I will do a follow up post when the track is finished :D

Last of all is the Birthday cake!!! A design with inspiration from the woman's weekly book, then changed, added to and personalised by the birthday boy, hubby and myself.
Due to multiple allergies we made our butter cake dairy, egg and nut free with frosting and marsh mellow icing for the roads and Declan sign.

We cheated a tad by using the toy cars and the plastic road accessories but it was easy and it seemed to work, not to mention Declan's joy when seeing the completed version.

A fun party had by all and as usual enjoyable to plan and create for.


Sunday, August 7, 2011

Peter the Brave Knight with Asthma


This morning we got out of the house for our fortnightly library visit and I couldn't stop smiling when I found a book with not only a Brave night, a dragon, imaginary play but lots of relevant information about asthma..........all subjects that Declan can relate to.
You can take a look at the book here :)

Needless to say with a Knight and Dragon on the front cover, Declan had a smile from ear to ear and immediately wanted to read it.
 After finding it only a few hours ago we have already read it at least three times at the library, put it in our library bag to take home and a very excited boy is waiting to show Daddy when he gets home from work.

Definitely a good book for our family to be reading now that Declan is a little older and becoming more aware about his allergies and asthma. It describes Asthma symptoms and treatments in concept and words that young children can relate to and also makes for a good story.

If you have a little person in your house who wants to tame the wild beast that is Asthma and have more time time chasing Dragons, here is a wonderful book to teach them how to manage and understand their breathing.

So thank you once again to the library, we love you and will continue to visit you often

Monday, August 1, 2011

Vintage Retro cushion

Just thought I'd quickly share with you the cushion I made last night while watching telly :)
I think it's a bit cute and will fit in nicely over in our book nook.

After typing up my last post the sewing bug has hit I felt like creating again and
remembering the utterly gorgeous mother goose fat quarters I brought ages ago made it very tempting indeed.
I tried to combine my love of vintage, retro, spots and stripes to make a lower back cushion all in under an hour. Loving the vintage charm that it brings in the lounge room!

here is a peek
the front

the back


Copyright 2009 Sublime Shambles of a Shell. Powered by Blogger
Blogger Templates created by Deluxe Templates
Wordpress by Wpthemesfree